

How To Build A Catio Off A Window
Window Catio Plans
This step by step diy projection is about window catio plans. I have designed these basic plans so you can make a uncomplicated just sturdy 24″x72″ enclosure for your window, then your pet tin can bathroom in the lord's day and withal exist safe. Remember to read the local codes before starting the projection, then you lot can comply with the regulations. Accept a await over the residuum of my woodworking plans, if you lot desire to go more building inspiration.
When buying the lumber, you lot should select the planks with neat care, making sure they are directly and without any visible flaws (cracks, knots, twists, decay). Investing in cedar or other atmospheric condition resistant lumber is a good thought, as it will pay off on the long run. Utilize a spirit level to plumb and align the components, before inserting the galvanized screws, otherwise the project won't accept a symmetrical look. If yous have all the materials and tools required for the project, you could get the task done in nigh one weekend. Run across all my Premium Plans Hither.
Projects made from these plans
10×xviii Pergola Plans – Free PDF Download
Building-a-window-catio
[tabs tab1="Materials" tab2="Tools" tab3="Time" tab4="Related Plans"] [tab id=1]
- A – 2 pieces of 2×2 lumber – 72″ long, 4 pieces – 21″ long 2xFRAME
- B – 6 piece of two×two lumber – 21′ long SUPPORTS
- C – 2 pieces of 1×four lumber – 24 3/4″ long, ane piece – 73 i/2″ long TRIMS
- D – i slice of ane/ii″ plywood – 22 one/ii″x72″ long FLOOR
- E – 1 piece 1×2 lumber – 72″ long SUPPORT
- F – 1 piece of 1/iv″ polycarbonate – 25″x74″ long ROOF
- Thousand – 1 piece of 2×4 lumber – 24″ long, i slice – xiv″ long, one slice – xix 3/4″ long 4xSUPPORTS
- 5 pieces of 2×2 lumber – 8′
- 2 pieces of 1×four lumber – viii′
- 1 slice of 1×ii lumber – 8′
- 3 pieces of 2×iv lumber – 8′
- one piece of 1/2″ plywood – 2'x6′
- 1 piece of polycarbonate – 48″x96″
- ane 5/8″ screws
- two 1/2″ screws, 3 one/2″ screws
- 1/iv″ polycarbonate
- hardware cloth
- wood filler , forest gum, stain/pigment
[/tab] [tab id=two]
Hammer, Tape measure, Framing square, Level
Miter saw, Drill machinery, Screwdriver, Sander
Prophylactic Gloves, Safety Glasses
[/tab] [tab id=3]
One week
[/tab][tab id=4]
- Catio plans
[/tab][/tabs]
Build a Window Catio – VIDEO!
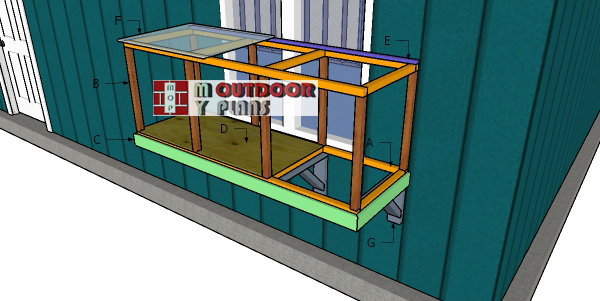
How to build a catio for window
Building-the-frame-for-the-catio
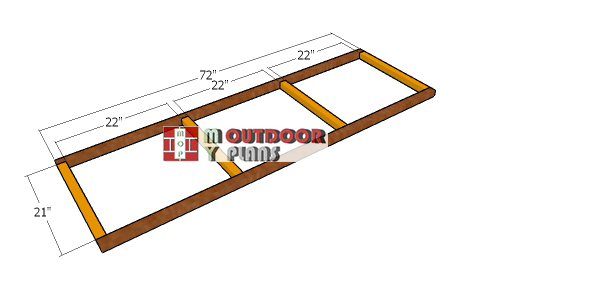
Start of all, yous need to build the two frames for the bottom and top of the catio. Cut all the components from 2×2 lumber and lay them on a level surface. Marshal the edges flush, drill airplane pilot holes through the 72″ components and insert three one/2″ screws into the perpendicular components.

Assembling the frame of the catio
Next, assemble the catio box, as shown in the diagram. Drill pilot holes through the top and bottom frames and insert 3 1/2″ screws into the vertical supports. Marshal the edges flush and brand sure the corners are foursquare.
Supports-for-the-catio
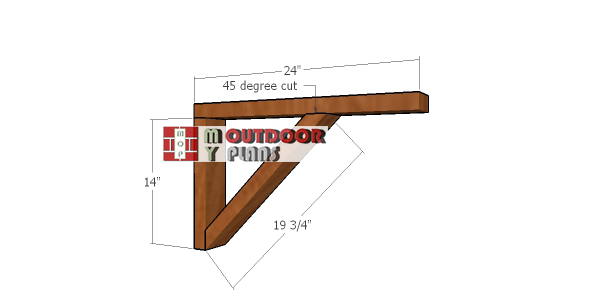
Utilize 2×4 lumber for the window catio supports. Use a miter saw to brand 45 degree cuts at both ends of the braces. Drill pilot holes and insert 3 1/ii″ screws to lock everything together tightly. Align the edges flush.

Fitting the window catio supports
Attach the supports to the wall and secure them into place with the advisable screws. Make certain you secure them to the firm framing, therefore arrange the distance between the supports. Fit the frame of the catio to the supports, drill pilot holes and insert 2 i/2″ screws to lock information technology into place.

Floor – window catio
Utilise 1/ii″ plywood for the flooring. Make certain you go for atmospheric condition resistant plywood, equally it will be exposed to the elements. Make notches to the plywood sail. Use a round saw to make the cuts and polish the edges.

Plumbing fixtures the floor – window catio
Fit the flooring sheet to the base of the catio and insert 1 5/8″ screws, every 8″ on eye.

Fitting the base trims – window catio
Use 1×4 slats for the base trims. Apply a miter saw to make 45 bevel cuts to the trims. Utilize two″ nails to secure them to the catio.

Plumbing fixtures the hardware cloth
Attach hardware fabric to the outside of the window catio. Staple the cloth to the frame of the catio.

Roof back up – window catio
Fit a slice of 1×2 lumber to the dorsum of the catio so you tin can create a slight gradient for the roof. Use 1 v/8″ screws to secure the slat into place.

Plumbing equipment the top console
Side by side, cut and attach a polycarbonate console to the top of the catio, making sure it overhangs on all sides. Use the advisable screws to secure the sheet to the frame of the catio.

Make sure everything is locked together properly. You can insert a few screws through the frame of the catio into the house, to add more than forcefulness to the project.

How to build a window catio
This catio is super simple to build and it will not hurt your upkeep either. You lot can make a few modifications to the plans, to suit your needs. See all my woodworking plans HERE. I accept tons of plans to choose from, so make sure you check them out for some outdoor inspiration.
This woodworking project was almost window catio plans free. If y'all want to encounter more outdoor plans, check out the rest of our footstep by footstep projects and follow the instructions to obtain a professional result.
Well-nigh The Writer
Ovidiu
I've been a designer and a woodworker since I first developed consciousness.
Source: https://myoutdoorplans.com/animals/window-catio-plans/
Posted by: lopezcoluseld87.blogspot.com
0 Response to "How To Build A Catio Off A Window"
Post a Comment